A beautiful ecstatic dance set gives people somewhere to begin, enough variety to explore, room for intensity, and a way home. The DJ makes hundreds of small decisions so that the dancers can stay with their own experience.
There are two practices to learn together. One is DJing: selecting music, listening ahead, matching levels, and moving between recordings. The other is shaping a dance: noticing the room, pacing its changes, working with a facilitator, and knowing when to leave something alone.
Why an excellent ecstatic dance mix is so demanding
Imagine moving from an unmetered voice into slow dub, then a swung rhythm, house, a fast broken beat, a folk song and finally spacious ambient music. The tempo, drum pattern, tuning, loudness, production style and emotional language may all change. Some tracks have long DJ-friendly introductions. Others begin with their most important lyric.
Compared with a set that stays within one genre and a narrow tempo range, that breadth can make mixing substantially more complex. A transition may need to preserve a dancer’s sense of continuity even when a continuous beat is impossible. At the same time, you are deciding whether the group needs more intensity, more familiarity, or more space.
Other DJ traditions can be equally demanding. Turntablism, open-format mixing and long club sets have their own depth. The useful distinction is the number of musical boundaries you need to cross, together with responsibility for a complete, responsive dance journey.
Preparing a set and improvising live
There are two broad approaches to DJing. Some DJs prepare the tracks in order and rehearse the transitions, so the mix and the journey are carefully worked out. Others preselect a pool of tracks, or arrive with a large library, and choose the sequence in the moment according to what they feel. Many DJs combine the two.
Improvising a clean, well-structured ecstatic dance set takes considerable experience. Crossing many genres and tempos, including tracks with unusual structures or without DJ-friendly intros and outros, makes it especially demanding. You need to know the music well enough to choose the next track and solve the transition at the same time.
My advice is to prepare in advance, particularly when you are getting started. Choose a route, work on the difficult transitions, and rehearse the whole set. Preparation gives you a musical journey you can trust while you are playing.
Prepare the journey, and keep songs in reserve
Select more music than you expect to play. Alongside your planned sequence, keep a few tracks that can slow the energy, increase momentum or lead into an earlier resolution. Learn how to move into and out of those alternatives too. You can improvise within a set you have already prepared.
Knowing the audience in advance is part of that preparation: ask who comes, what kind of dance they expect, and what the space is like. Then create a journey for those people and give it room to carry them. If you feel you need to change everything live, it may be a sign that you did not understand the audience well enough beforehand. Make that a question to revisit when you review the set.
Let transitions serve the music. A long, technically perfect blend can flatten a song. A well-placed clean cut can feel completely right. Selection, timing and restraint matter as much as dexterity.
02 / Your setup
Learn a small setup very well.
You need to hear the current music, preview the next track privately, and control the change between them. Start with equipment that lets you do those things reliably. Four decks, elaborate effects and expensive players can wait.
Laptop + controller
Software holds your library; the controller gives you physical deck and mixer controls. Choose a supported combination with separate main and headphone outputs. Check the computer’s operating system, connections and the exact controller’s compatibility before buying.
Standalone players + mixer
Tracks play from prepared media without a laptop. Learn the venue’s exact equipment, export format, supported files and USB requirements. Test both copies of your media on the intended players.
Headphones + monitoring
Closed headphones let you preview at a reasonable level. A booth monitor or a clear headphone master mix helps you hear timing without relying on delayed sound from distant speakers. Use wired monitoring for mixing.
Software
Traktor, rekordbox, Serato and VirtualDJ are established options; Mixxx is a free, open-source route. Ableton Live offers a different, clip- and arrangement-based approach. Choose for your hardware and intended workflow, then learn one system instead of changing every week.
For a first controller, I recommend the Pioneer DJ DDJ-FLX4: a relatively affordable starting point with a useful range of controls and rekordbox compatibility. Its eight performance pads per deck give direct access to Hot Cues A–H in Hot Cue mode. Check local pricing and computer compatibility before buying.
For home practice, use modest speakers at a comfortable level. For an event, the PA, coverage and cabling should fit the venue. A controller is not a PA, and a large speaker is not automatically an evenly distributed sound system.
Follow the signalOne clean stage at a time
Music fileSource quality
Deck + trimMatch track levels
EQ + faderShape the blend
MasterClean output
PA systemRoom level
Headphone cue previews the incoming deck separately. A clean master meter does not prove that an earlier stage, the venue mixer or the speakers are clean.
Know these controls before adding effects
Play and cue start, stop and return to a prepared point. Tempo changes playback speed. A jog wheel or nudge temporarily shifts timing. Trim or gain matches the level of a loaded track. EQ adjusts frequency ranges; the channel fader controls how much of that track reaches the mix. The crossfader can move between assigned decks, but channel faders alone are also a valid workflow.
Headphone cue/PFL selects what you preview. The headphone cue/master blend is separate from the audience mix. Test that distinction with the incoming channel fader down: you should hear that deck in headphones while the room still hears only the outgoing track.
Before an event, rehearse loading a track, recovering from a wrong button press, selecting the correct audio output and starting backup playback. Familiarity is worth more than a crowded feature list.
03 / Your music library
Collect possibilities for movement.
A small library you know intimately is more useful than thousands of half-heard downloads. Listen from beginning to end. Dance to the track. Notice what changes when you stop looking at its waveform.
My discovery loop
A lot of the time, I let Spotify play according to the energy I’m in. When I find new music I really love, I add it to the right playlist: The Opening, The Warmup, The Buildup, The Climax, The Resolution, or The Closing. I also explore the suggestions for each playlist.
Then I listen through my playlists again and again, so I know the songs very well. Discovery feeds the library; repeated listening makes that library useful when I’m playing. This is the workflow I use, and I find it very efficient.
I use the same six-part organization in my DJ software when preparing a set. Spotify is my listening and discovery space; the event library still needs playable, authorized music files and a tested backup.
Other ways to discover music
Follow producers, labels, remixers and musicians credited on releases. Study tracklists from DJs whose journeys you enjoy. Search by an instrument, rhythm or scene as well as a genre. Explore the Onizal artist directory, then listen to original releases rather than collecting only other people’s sets.
From Spotify discovery to a playable file
Finding a track is the first step. Next, get a music file you can prepare and play in your DJ software. Spotify’s offline downloads are for listening within Spotify; they are not MP3 or WAV files you can export into your library. See Spotify’s explanation.
Identify the exact version. Note the artist, title and remix name. Check the release or label: a radio edit, extended mix and remix can have very different arrangements.
Find an authorized download. Look for the artist or label on Bandcamp, check a download store such as Beatport, or follow the artist’s official purchase link. If a track is offered free, use the download the artist or rights holder has provided. If you cannot find a release, ask the artist or label whether a download is available.
Choose a supported format. Bandcamp offers MP3 320 and lossless formats such as WAV, AIFF and FLAC. Check your DJ software and event equipment before choosing. Converting a poor recording to WAV does not restore missing detail.
Import into the matching playlist. Add the file to The Opening, The Warmup, The Buildup, The Climax, The Resolution, or The Closing in your DJ software. Verify tempo and key, prepare cues, and listen to the whole file.
Keep a backup. Save the original download and back up your library, playlists and cue points. Test the file on the equipment you will use.
Use Spotify to discover and remember music, then purchase or obtain the authorized file separately. A streaming subscription and a purchased download are different things; for an event, know exactly what your setup can play without an internet connection.
Keep a local, tested event library. Streaming integrations, subscriptions and offline modes vary by service and equipment; do not discover those restrictions at the venue. Maintain a separate backup of both your music and your library database, including playlists, cues and edits.
Keep tagging useful, and optional
You can spend a long time tagging every song. For me, the priority is simpler: when I want to play a new track, I listen to it, check that the software analysis and beatgrid make sense, and set useful cues. Those landmarks are probably the most important part of my preparation. Add tags when they help you find music; you do not need a perfect catalog before you can mix.
An example track note
94 BPM · half-time feel · warm / weighty · energy 3/5 · sparse vocal · clean exit at 3:12 · bass enters after 16 bars
Useful tags include tempo, perceived energy, rhythm family, emotional color, vocal content, language, density and possible role in a set. Add notes such as “false ending,” “sudden loud hit,” “live drums drift,” or “spoken introduction.” Genre labels alone will not find the gentle track you need after an unexpectedly intense passage.
Listen, check the grid, then set cues
Check the file. Listen for glitches, unwanted silence, clipping, surprise lyrics and abrupt endings. Compare its loudest section with other tracks.
Verify the analysis. Check BPM, the first downbeat and whether the beatgrid still follows the music later. Software can read a tempo at half or double its useful value.
Mark musical landmarks. Set cues at a reliable entrance, a major change, a useful breakdown and your exit. Use a consistent color or naming scheme.
Test a loop. A clean percussion loop can buy thinking time. Check the join by listening, not just by trusting its visual length.
Find two neighbors. Rehearse one way into the track and one way out. For awkward tracks, also prepare a clean-cut or beatless exit.
The eight-cue structure I use
This is the order I usually aim for. The first two cues offer different intro runways; the last two offer different outro runways. “Before drop” means eight bars before the drop, not eight beats. In 4/4, eight bars contain 32 beats.
A / 01
Intro · 16 bars
An entrance with 16 bars of useful introduction before the next main section.
B / 02
Intro · 8 bars
A shorter entrance into the same introduction.
C / 03
8 bars before the first drop
A preparation point before the first main rhythmic arrival.
D / 04
The first drop
The actual downbeat where that main section arrives.
E / 05
8 bars before the second drop
A preparation point for another major arrival.
F / 06
The second drop
The downbeat of that second main section.
G / 07
Outro · 16 bars
An exit marker with 16 useful bars remaining before your intended finish.
H / 08
Outro · 8 bars
A shorter exit marker before that same finish.
I also play unusual tracks that do not follow this structure. I move the cues to fit the music. A track might have one drop, no drop, a short intro or an irregular phrase. Leave unnecessary pads empty, use a cue for a useful vocal, breakdown or tempo change, and name it clearly. The letters describe cue roles; they do not guarantee eight separate, evenly spaced moments.
Set the drop cue by listening, then count or beat-jump backward to place its preparation cue. Check the beat-jump unit: 8 bars is 32 beats in 4/4. Listen again to confirm the entrance. If a grid follows the beginning but drifts later, correct the analysis or use an approach suited to live timing instead of forcing the track onto a rigid grid.
Watch preparation happen, then build your system
I recommend watching a couple of track-preparation videos, then practicing on your own music. Start with Crossfader’s video lessons on getting started with rekordbox and preparing a playlist and mix. They include YouTube demonstrations; software screens may differ by version. Look for how the DJ checks analysis, chooses phrase boundaries and places cues, rather than copying every marker blindly.
Prepare one familiar track, then one unusual track. Rehearse an entrance and an exit for both. Keep a naming and color system you recognize immediately. Once that system works for you, preparation makes mixing much easier: you can see your options and spend more attention listening to the room.
Use the six playlists as broad homes for your tracks, then add useful tags or sub-playlists within them. A track can belong to more than one stage. Keep a separate rescue crate of familiar, spacious music you can play confidently while solving a problem.
04 / Beats, bars & phrases
Hear the structure under the sound.
The beat is the pulse you tap to. BPM means beats per minute. A bar groups beats; in 4/4, count “one, two, three, four.” The downbeat is the first beat of a bar. A phrase groups bars into a musical thought.
In much electronic dance music, changes arrive in groups of 8, 16 or 32 bars. Listen for an entering bassline, a disappearing kick, a new vocal or a drum fill. These are clues, not guarantees. Live music, odd meters, pickups and unusual arrangements need their own count.
Beatmatching aligns the speed and placement of beats. Phrase matching aligns larger musical changes. Two kicks can land together while a chorus crashes into the middle of another song’s sentence. This is why phrasing changes the quality of a mix.
A phrase-aligned transitionExample · 16 bars in 4/4
1591317
A
Outgoing track · outro
Out
B
Incoming track · intro
Drop
Start B on A’s phrase boundary → Let B take over at the next change
The two arrangements change together. At 120 BPM, these 16 bars take 32 seconds. Check the actual tracks: a pickup, extra bar or live drummer can change the count.
A listening exercise
Pick one clear 4/4 track. Count four beats aloud, then count bars: “one-two-three-four, two-two-three-four…” Raise a hand when an instrument enters or leaves. Start again at that change. After a few listens, predict the next change without looking at the screen.
Sync is useful. Your ears still decide.
Sync can align decks when the underlying analysis is correct. It cannot decide whether the grooves belong together, whether two singers overlap, or whether a live drummer has moved away from the grid. Learn to nudge timing and hear drift even if you normally use sync.
If the same tempo keeps falling out of alignment, check the grid and BPM. If the tempo genuinely varies, use supported flexible grids, a short manually corrected blend, or a transition that does not require a long rhythmic overlap. The Mixxx mixing manual explains both manual matching and synchronization.
05 / Your first mix
Two tracks. One clear handover.
Begin with two steady 4/4 tracks at nearby tempos, with sparse instrumental intros and outros. Save dramatic genre changes for later. For this lesson, track A is playing; track B is the incoming track. Keep the speakers quiet enough to think.
Prepare B privately. Load it onto the idle deck. Set its channel fader down, reset inherited effects and check crossfader assignment. Select headphone cue for B. Find its first useful downbeat and check a louder section to set its trim.
Match speed. Adjust B’s tempo toward A, or use sync after checking both grids. For manual practice, start B, listen for the beats drifting apart, and correct the tempo in small steps. Nudge it back into alignment after each adjustment.
Choose the musical join. Find a clear phrase boundary in A. Return B to its prepared cue. Start B on the “one” so that its intro reaches a meaningful change when A’s outro does.
Listen before opening the fader. Hear both decks in the headphones. Correct doubled kicks or rhythmic flamming. If you are late, wait for another suitable phrase instead of forcing the entrance.
Introduce B. With B’s low EQ reduced, raise its fader gradually. Listen to the room mix as well as the headphones. Leave A carrying the bass while B’s lighter elements arrive.
Hand over the low end. At an appropriate musical boundary, reduce A’s bass as B’s bass comes in. The exact movement depends on the tracks and the mixer’s EQ curve. Avoid a large bass overlap or an unintended hole.
Finish the change. Lower A’s fader when its role is complete. Clear its effects and restore controls before loading another track. Keep listening to B: the transition is only part of the song.
EQ is space-making
Low frequencies often carry the kick and bass; the middle contains much of a voice and many instruments; the top carries hats and brightness. These regions overlap. Use the track’s actual sound to guide your hand, and remember that boosting several bands can push the signal into clipping.
A filter can thin a track before an exit, but excessive resonance can become sharp or unexpectedly loud. Reset it after use. “Everything at twelve o’clock” is not a universal neutral setting for every effect or piece of hardware: learn yours.
06 / Crossing musical worlds
There is more than one good transition.
Choose the transition by asking what needs to survive: the pulse, a melody, a vocal meaning, a texture, or simply the feeling of an ending. Try these six approaches in rehearsal before depending on them live.
01 · Nearby tempos
The long blend
Use rhythmically compatible tracks with room in their arrangements. Align tempo and phrases, introduce a sparse layer, hand over bass, then remove A. A 16- or 32-bar blend can work, but the music determines the length.
Listen for: clashing vocals, busy midranges or a transition that drains both songs of character.
02 · A clear change
The phrase cut
Finish a musical thought and switch decisively at the next entrance. Match perceived levels beforehand. A brief fade can avoid a click while preserving the intended cut. Useful for tracks that sound worse when overlapped.
Listen for: an incoming pickup or vocal that needs to start before the downbeat.
03 · A tempo reset
The breakdown bridge
Let A reach a passage without a strong pulse. Bring in B’s atmosphere or introduction, then allow B to establish its own rhythm. Choose compatible textures and keep the overlap short if the harmonies disagree.
Listen for: a hidden rhythmic pulse or melodic clash inside the supposedly “empty” passage.
04 · A short release
The echo exit
On a rehearsed beat or phrase ending, let a short, controlled echo carry the last sound as the dry track leaves. Bring B in clearly. Check whether your effect continues after the channel fader closes; effect routing differs.
Listen for: old-tempo repeats fighting the new groove, excess feedback or a bass-heavy tail.
05 · A rhythmic relationship
The half-time bridge
Explore a shared pulse such as 85 and 170 BPM. Phrase the handover so a slower body pulse can open into faster subdivisions. Verify the snare placement and swing; a numerical relationship is only the starting point.
Listen for: a sudden physical demand even when the two grids align.
06 · A change of chapter
The intentional ending
Let a song resolve. Leave a deliberate breath or silence, then begin the next piece. This can honor an acoustic ending or prepare a landing. Decide with the facilitator how silence is held so it does not look like a technical failure.
Listen for: an emotional conclusion being interrupted because the next track is already queued.
Loops, stems and effects: add them with a purpose
A loop can extend a percussion bed while you prepare the next entry. Avoid trapping a lyric mid-sentence or looping so long that the musical thought disappears. Exit the loop intentionally and check where the underlying track will resume.
Stem separation can remove a vocal or isolate drums, but listen for watery artifacts, missing transients and leftovers from the removed part. Prepare important separations in advance and keep the original available. An effect should solve a musical problem or create a chosen moment; it should not conceal that you have not chosen the next track.
07 / Tempo & harmony
The number is a clue. The groove is the test.
A heavy 90 BPM track can feel more intense than an airy 125 BPM track. Density, bass weight, subdivision, dynamics, dissonance and familiarity all affect the experience. Keep separate notes for measured tempo and perceived energy.
One pulse, two readingsIllustrative half-time relationship
85 BPM
170 BPM
The faster pulse has two beats for each slower beat. The drum patterns, accents and phrases still need to work together. These dots show timing, not a promise of compatibility.
Moving from 100 to 124 BPM
That is a 24% increase, large enough to change the character of many recordings. You could move through intermediate tracks over several selections, use a track with its own tempo change, or reset the pulse through a breakdown. You can also make an intentional cut. Pick a route the music supports instead of stretching everything until it fits.
When changing the tempo of a playing track, listen for awkward vocal phrasing and damaged transients. Key lock/master tempo tries to preserve pitch while speed changes; it can produce artifacts, especially with larger changes. Without it, speed changes also change pitch. Compare by ear at the actual amount you intend to use.
Harmonic mixing without becoming trapped by the wheel
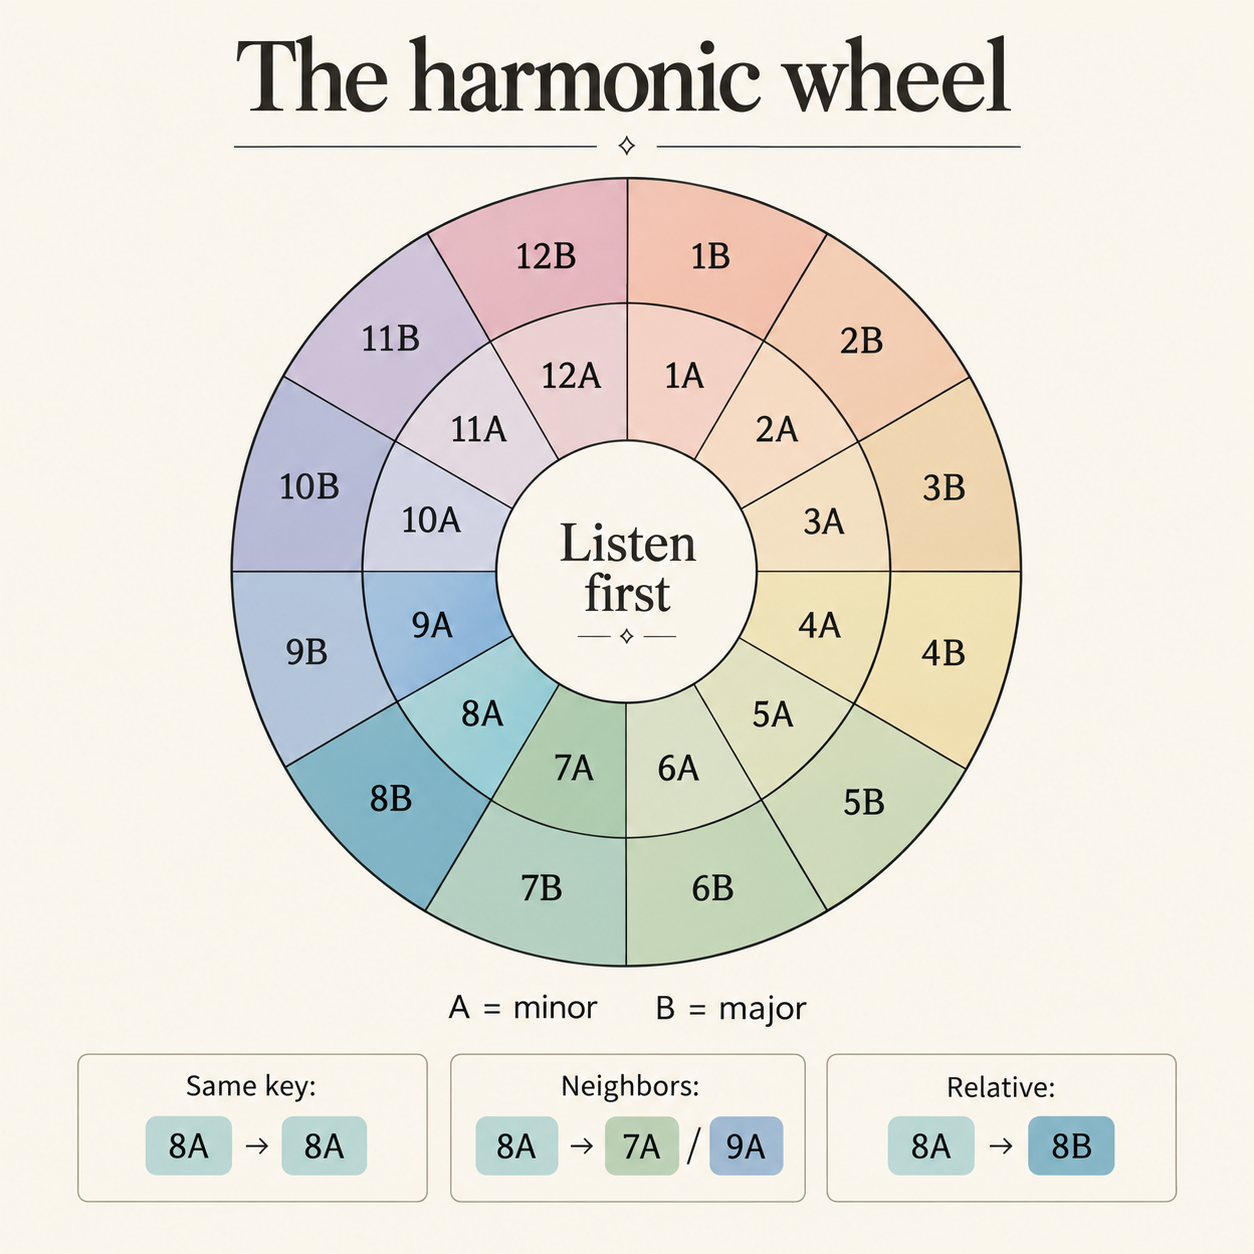
Compatible keys can make overlapping melodies feel settled. Use the same key, an adjacent position on the same ring, or the relative major/minor as starting points. For example, in Camelot notation, 8A can suggest 7A, 9A or 8B. Open Key uses different labels: do not treat its numbers as interchangeable.
Camelot notation: A means minor; B means major. Numbers wrap from 12 to 1. Download the wheel
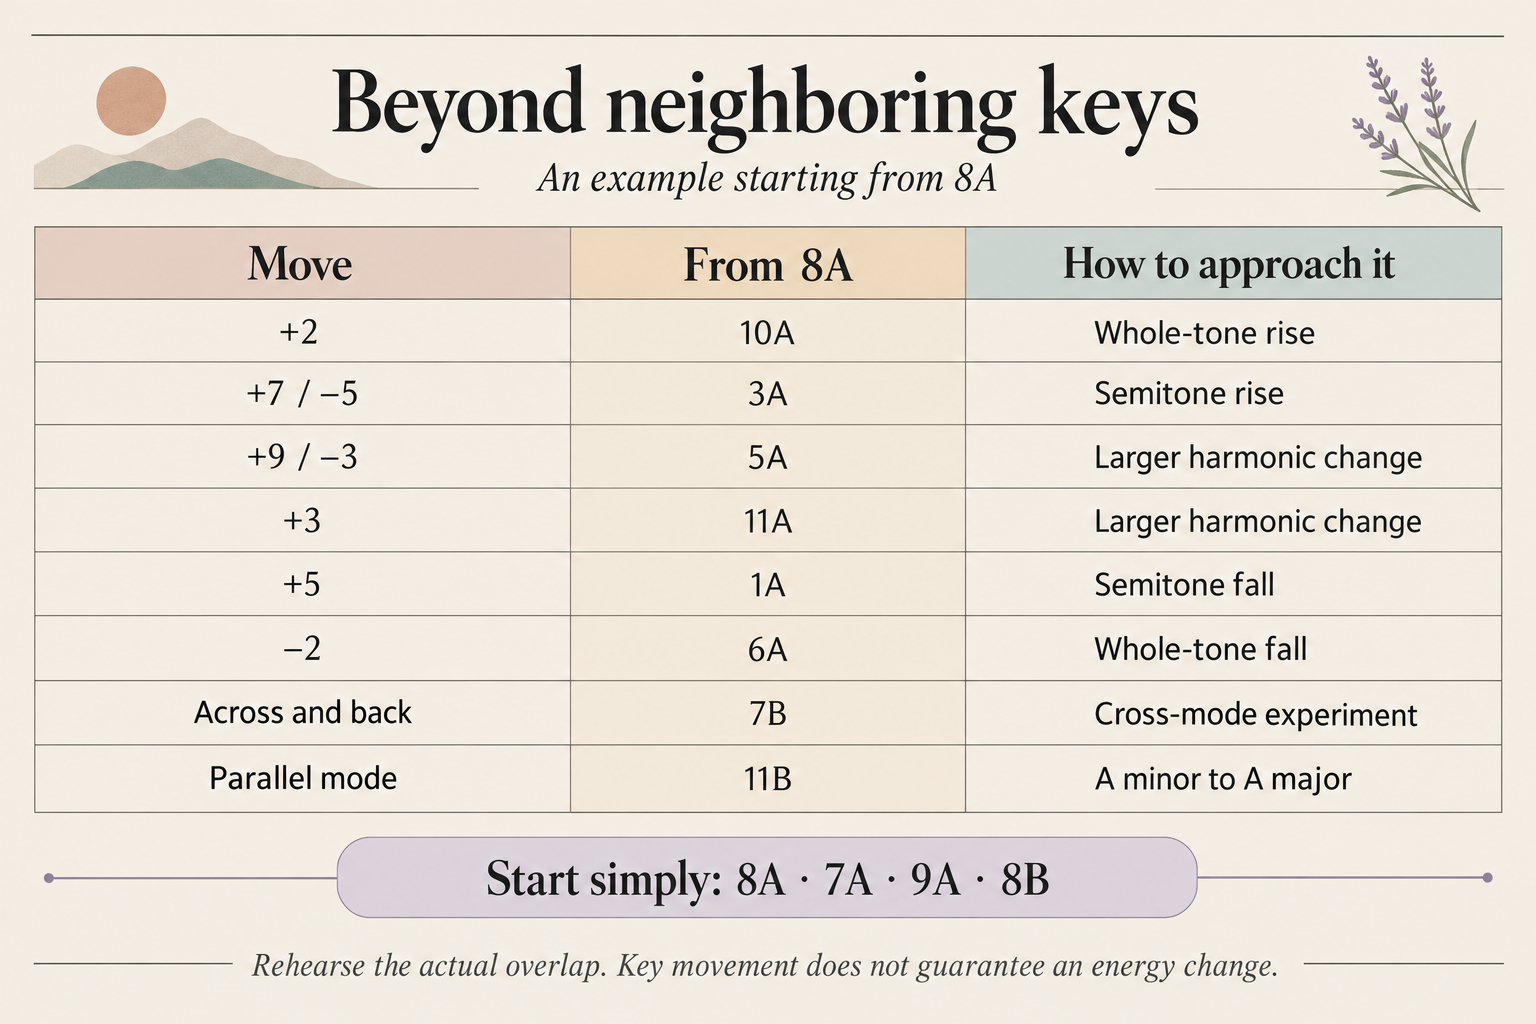
Beyond neighboring keys
The more complex chart opens up additional routes. Begin with neighboring keys and relative major/minor, then audition the larger changes. The “+” and “−” marks in charts like the one shared here are shorthand for suggested changes, not a dependable energy rating.
Mixed In Key’s energy-mixing guide describes +2 and −5 as advanced moves to test. A number change is not a BPM change. Larger shifts can introduce tension or clashing notes: try a short overlap, a percussion-led handover or a breakdown rather than assuming a long melodic blend will work. Arrangement, tuning and the actual tracks decide.
Explore all 24 starting keys.
Possible routes from 8A. Listen before choosing.
Common options and advanced experiments
Move
Next key
Listening direction
Same key
8A
Start here
Neighbor −1
7A
Common starting point
Neighbor +1
9A
Common starting point
Relative major / minor
8B
Same scale, different home note
+2
10A
Whole-tone rise
+7 / −5
3A
Semitone rise
+9 / −3
5A
Larger harmonic change
+3
11A
Larger harmonic change
+5
1A
Semitone fall
−2
6A
Whole-tone fall
Across and back
7B
Cross-mode experiment
Parallel mode
11B
Same home note, different mode
Key detection can be wrong, and a track can change key. Even correctly labeled tracks may clash because of their melodies or tuning. Preview the actual overlapping passages. If they fight, choose a shorter overlap, a percussion-only moment, or a clean ending. The Native Instruments harmonic-mixing guide treats the wheel as a useful guide rather than a rulebook.
Harmonic smoothness is one option in a much bigger musical language. A track that belongs emotionally does not need to be rejected because of a label. Find an entrance that lets it be itself.
08 / The musical palette
Different rhythms. Different invitations.
Ecstatic dance is an approach to a musical journey, not a single genre. The table below offers listening directions. These are possibilities, not fixed emotional effects or compulsory stages. Every genre contains exceptions.
Ambient, drone & spacious acoustic music
Space, listening, small movement
Check for a hidden pulse, unexpected loud passages and unresolved endings. Useful beyond the opening and closing.
Dub, downtempo & trip-hop
Weight, sway, grounded rhythm
Bass can be powerful at low tempos. Leave space around it and listen to swing before blending.
Funk, soul, disco & hip-hop
Play, bounce, articulation
Live timing, vocal density and syncopation often matter more than the BPM label. Check lyrical content.
House, organic house & percussion-led electronics
Continuity, traveling, sustained groove
Steady drums can support longer blends. Similar tempo does not mean similar mood or intensity.
Breaks, UK garage & bass music
Offbeat movement, elasticity, surprise
Study the kick and snare relationship. A straight-to-broken transition can change how the body locates the pulse.
Techno, trance & psytrance
Drive, repetition, sustained intensity
Build a reason to arrive here and leave a route out. Fast or dense music is an option, never a requirement.
Jungle & drum and bass
Fast subdivisions, release, half-time possibilities
Try dancing at both pulse readings. A half-time numerical match does not erase a change in texture or demand.
Folk, orchestral, devotional & live recordings
Melody, story, unfamiliar movement
Know the cultural context and arrangement. Honor the complete phrase; use shorter or beatless transitions when needed.
Find a thread between contrasting tracks: a drum timbre, a melodic gesture, a voice, a rhythmic accent or an emotional color. Then let something change. Coherence does not require every recording to sound alike.
My view on pop music
Personally, I don’t like pop music in ecstatic dance. A familiar song can bring someone’s attention back to “Oh, I know this song,” and invite them to sing along. That can be fun, but for me it can create more of a party atmosphere, with less room for introspection and depth.
I’m looking for music that lets the body enter a space where thought becomes quieter. For the kind of dance I want to create, I generally avoid radio pop and songs people immediately recognize. This is my personal view on selection, rather than a rule for every ecstatic dance community.
If you want to include pop, my recommendation is one track at most in the whole set. Choose something less widely known, and look for a remix that meaningfully changes the original. Listen carefully: a remix can still be instantly recognizable. Ask whether it serves the journey and the atmosphere you want to hold.
09 / Play the room
The same DJ. A different invitation.
The room is both a physical space and a group of people. These six starting points are Onizal’s practical suggestions, not rules about an audience’s taste. Ask the host, visit when possible, and adapt what you hear.
01Close · spacious · detailed
The intimate studio
In a small room, the subtleties arrive quickly. Try acoustic textures, dub, spacious downtempo and a few clear grooves before dense arrangements. A small dance can still become fierce when the people want it.
How to adapt your set
Keep transitions uncluttered. Listen away from the booth: hard walls may make percussion and layered bass tiring. Give beginners time to discover each rhythm.
A trap to avoid: Assuming a small room needs a small emotional range.
02Familiar · curious · connected
The weekly community dance
Regular dancers bring a shared musical memory. Balance recognizable rhythmic territory with new producers, different instruments and occasional surprises. An established community may welcome deep bass and unusual structures.
How to adapt your set
Ask the local host what has been working. Build several possible routes through the peak, and notice newcomers as well as confident regulars.
A trap to avoid: Playing to the most expressive people at the front.
03Open · changing · expansive
The festival floor
People may enter halfway through, drift between stages or arrive already activated. Clear rhythmic entrances and shorter introductions can help. Breaks, house, bass music and percussion-led material can all make a strong invitation.
How to adapt your set
Confirm your place in the running order. Coordinate the opening and finish with adjacent acts. Leave recovery space even when the system can deliver enormous impact.
A trap to avoid: Treating every track as a headline moment.
04Attentive · flexible · collaborative
The retreat or guided workshop
The music may support an exercise, partner exchange or spoken instruction. Pick spacious passages under speech and tracks whose structure matches the activity. Instrumental sections help a voice stay intelligible.
How to adapt your set
Agree hand signals and who controls the timing. Keep loops, a longer instrumental and a gentle exit ready if an exercise needs more or less time.
A trap to avoid: Letting a predetermined drop overrule the facilitator or group.
05Airy · patient · grounded
The outdoor or sunrise dance
The setting, temperature, wind and time of day change how a set lands. Acoustic colors, spacious electronics and a gradual awakening are possible starting points, not rules about what sunrise must sound like.
How to adapt your set
Sound-check the listening area with the engineer. Plan power, shade, weather cover and local sound limits. Let the actual dancers determine whether the set grows toward intensity.
A trap to avoid: Adding bass or master volume to compensate for every outdoor difference.
06Driving · physical · rhythm-led
The club or late-night crossover
A rhythm-literate audience may settle into longer blends and sustained grooves. House, techno, breaks or bass can provide continuity while slower and more open passages create contrast.
How to adapt your set
Make the ecstatic dance agreements explicit with the host. Learn what the audience came for and how the space is held. A club setting does not automatically establish a conscious-dance container.
A trap to avoid: Thinking either relentless intensity or a ceremonial opening is compulsory.
A morning community gathering may love fast, heavy music. A late-night floor may need tenderness. Check assumptions about age, culture, disability or experience with actual people. Leave space for different bodies and ways of dancing within the same set.
10 / Shape the journey
Compose an arc. Keep it alive.
Begin with a shape you can understand and change. I organize my music into six playlists: The Opening, The Warmup, The Buildup, The Climax, The Resolution, and The Closing. This is the method I use, and I find it very efficient. I use the same structure for my library and for building a set. Other DJs may use different names or structures. This is separate from the five phases of The Onizal Dance.
01
The Opening
Arrive
02
The Warmup
Awaken
03
The Buildup
Grow
04
The Climax
Peak
05
The Resolution
Release
06
The Closing
Land
Make it practical
Sketch your playing time.
For a 60-minute set, one wave can work beautifully. Personally, I prefer at least 90 minutes: two or three musical worlds give me more room to take people on a deeper journey. Here are my starting points: 60 minutes with one wave, 90 with two, and 120 with three. Adapt them to the room.
Include only your music time. Agree opening circles, spoken guidance and closing separately. These timings are examples for rehearsal, not a schedule to obey.
90-minute example · 2 waves · 2 peaks
Room to rise. Room to return.Energy, not BPM
Opening and Warmup happen once. Buildup → Climax → Resolution can repeat. Closing completes the journey. A peak need not be your fastest or loudest track.
0–6 min
The Opening Arrive
Space, texture and a gentle invitation. Let people arrive in their own bodies.
6–15 min
The Warmup Awaken
Introduce a readable groove. Give movement time to develop before adding force.
15–27 min
The Buildup Wave 1 · Grow
Increase momentum gradually. Give the next musical world a clear entrance.
27–37 min
The Climax Wave 1 · Peak
Sustain a coherent passage of intensity, with room to choose a softer route.
37–45 min
The Resolution Wave 1 · Release
Reduce urgency and density. Let dancers recover and the musical thought resolve.
45–57 min
The Buildup Wave 2 · Grow
Increase momentum gradually. Give the next musical world a clear entrance.
57–69 min
The Climax Wave 2 · Peak
Sustain a coherent passage of intensity, with room to choose a softer route.
69–81 min
The Resolution Wave 2 · Release
Reduce urgency and density. Let dancers recover and the musical thought resolve.
81–90 min
The Closing Land
Offer a complete ending. Thin the pulse and leave the agreed space for quiet.
Build and rehearse your set
Write the event brief. Describe the people, setting, duration, purpose and practical limits in a few lines.
Choose the landing early. Know the kind of ending you can offer, with alternatives if the room changes.
Select a few anchor tracks. An opener, a grounding groove, a possible peak and a resolution give the set a backbone.
Build neighborhoods around them. Gather compatible choices rather than only one next track. Prepare a softer and a stronger branch.
Rehearse the difficult joins. Work specifically on tempo resets, live timing, vocal changes and the transition out of your peak.
Record a full rehearsal. Track lengths add up differently after overlaps, loops and early exits. Check the real playing time, then listen again later with fresh attention. Note the moments you want to improve.
Dance the whole route. Stand up and move while mixing, then dance to the recording away from the controls. Notice whether your body gets time to enter each world and whether the ending feels earned.
Give each world time to unfold
I like to start with arrival and awakening, build to a climax, then come down into resolution. From there, I may build again, reach another climax, and resolve again. In a longer set I might repeat that a third time before closing.
Slowness makes the faster passages meaningful. If I keep playing fast tracks, people can get tired, want a break, and start thinking “I’m tired” instead of staying immersed in the dance. The dips help keep the journey engaging. Watch the room: a resolution can stay rhythmic, and a new buildup does not need to begin from silence.
Group tracks into passages in every phase
My library is organized around the six phases. When I build a set in my DJ software, I group tracks of a similar genre together in the playing sequence, so dancers have time to inhabit a musical world before I take them into another one. This applies in every phase: The Opening, The Warmup, The Buildup, The Climax, The Resolution, and The Closing.
The climax is just one example: I might play a couple of techno tracks, then a couple of drum and bass tracks, before descending into resolution. The same principle works earlier or later in a set, such as letting a few ambient pieces unfold before moving into a downtempo passage. Each track still needs to fit the energy of its phase.
One possible climax
TechnoA couple of tracks
Drum & bassA couple of tracks
ResolutionBegin the descent
A climax example of a principle that applies throughout the set: let each passage develop, then prepare the transition into the next world.
What I avoid is jumping techno → drum and bass → techno → jungle → drum and bass, one track at a time, without a clear intention. Grouping tracks makes the progression easier to follow and the difficult genre transitions easier to prepare. This is a useful default, not a ban on a well-chosen surprise.
Find the next track within a phase
Inside each phase playlist, I usually sort my selected tracks by BPM. That puts many compatible choices near each other. I also keep the genre column visible, although those tags are not always perfectly organized. Tempo is a useful first pass, not proof of genre: ranges overlap, and drum and bass may be analyzed at half-time.
Once I have a promising neighborhood, I sometimes sort or filter by musical key to explore harmony. I still listen in my headphones: a matching key cannot make incompatible grooves, crowded vocals or the wrong energy work. I start in the right phase playlist, sort by BPM to find a useful neighborhood, and listen for tracks that can continue the passage. Sometimes I use key to explore a harmonic possibility. Genre is a clue to the sequence, rather than the structure of my library.
Community approaches differ. EcstaticDance.org’s journey map and DJ Divana’s seven-stage model offer other ways to think about progression. The 5Rhythms Wave belongs to Gabrielle Roth’s named movement practice; an ecstatic dance arc should not be presented as teaching that method. Explore the distinctions in the movement library.
11 / Read the dance floor
Look up. Leave room for difference.
Begin with the journey you prepared for this audience. Give it time to unfold, and use what you observe to make thoughtful adjustments. Every individual movement does not require a new musical direction.
Notice the whole room: the edges, the middle, people resting, people arriving, people using smaller movements. Big movement is not the only sign of engagement. Stillness may be a choice. A person leaving may need water, quiet or a bathroom; it is not automatically a verdict on the music.
Look for patterns over time rather than decoding someone’s inner life from a gesture. Are people finding their own rhythms? Does the floor seem able to inhabit a track before it changes? Do several people cover their ears when a sharp element arrives? Is the room becoming crowded enough that a more contained movement invitation would help?
If the room seems hesitant
Offer a readable pulse or something rhythmically familiar. Let it last long enough to become usable. You may need clarity and patience rather than a louder drop.
If people seem tired
Reduce density or urgency. A spacious groove can preserve continuity while allowing smaller movement. Check heat, ventilation and water with the host; music cannot solve every room problem.
If a surprise disconnects the floor
Give it a little time, then return to a musical element people can recognize: a pulse, an instrument, a texture or a familiar rhythmic family. You do not need an immediate second surprise.
If the room is deeply engaged
Resist changing tracks just because the next one is ready. Let the current musical thought unfold. Prepare the next move without pulling attention toward the booth.
Offer emotion; do not prescribe it
A fierce track may feel joyful to one person and unwelcome to another. A tender song may invite movement, sadness, indifference or rest. Avoid announcing what everyone is supposed to release, feel or heal. Keep people free to step away, and make support available through the event team.
Agree beforehand who responds if someone needs help. If you are also facilitating, simplify the mixing enough to remain available, or work with another person. Holding the music and providing individual support can require attention in two places at once.
12 / Sound that serves the dance
Let it feel full. Keep it clear.
Sound quality shapes how long people want to remain in a room. Aim for intelligible music and even coverage. Ask a competent sound technician to handle system tuning, speaker placement, limiting and venue requirements, especially with a large or unfamiliar PA.
Set levels through the whole chain
Sound-check a representative loud passage, leaving headroom at the deck, mixer and system. Match the next track using both meters and perceived loudness. An older acoustic recording and a heavily limited electronic track can show similar peaks while feeling very different.
Check the channel meter before the master. Turning down the master cannot repair distortion already created upstream. Avoid using gain increases to manufacture each new peak. Serato’s gain-structure guide explains why every stage matters.
Walk the actual dance floor
Listen at the front, center, rear and edges during sound-check. Notice boom, harshness, missing detail and large differences in level. A reflective hall may need less layered percussion and shorter reverbs. A bass problem in one location should not automatically become an EQ correction for everyone.
Keep the microphone behind the speaker coverage where appropriate, check it with the technician, and mute it when unused. Secure stands and cables away from movement paths. Connect and disconnect with outputs muted; follow the venue’s power-up and shutdown procedure.
Agree the sound limit and who monitors it before starting. Use calibrated measurement, not the master knob position or a phone’s unverified reading. Make earplugs and quieter space easy to find. Protect your own hearing too: keep the booth and headphones as low as practical, and avoid turning up as your ears tire.
13 / Play a real event
Prepare the practical. Stay available for the living.
Before you say yes
Ask about audience, accessibility, dance agreements, expected musical character, duration, arrival music, closing format and who holds the room. Confirm equipment, inputs, monitoring, sound limits, load-in, fee, travel, recording permissions and your point of contact. Put the essential agreement in writing.
Find out whether your allocated time includes the opening circle, announcements and landing. Ask how the host signals a shorter set or an urgent stop. If you follow another DJ, find out whether the intention is a continuous handover or a fresh beginning.
On the day
Arrive early enough to test your exact files, outputs, headphones, power and backup route. Use a stable software version you have rehearsed. Disable unwanted notifications and automatic interruptions. Keep the laptop ventilated and powered; secure connectors, adapters and drinks.
Have spare media, the cables your setup requires, and an independent playback device with a suitable, authorized backup recording or tracks already available offline. Test the backup connection at sound-check. A backup sitting on the same failed laptop is not independent.
Working with a voice or live musician
Agree the cue, musical key where relevant, approximate section length and exit before the dance. Leave frequency and rhythmic space for the live part. A percussionist may need clear monitoring; a singer needs a reliable mic level. Decide who follows whom if the timing changes.
For spoken guidance, lower the music before the speaker begins and choose a sparse instrumental passage. In The Onizal Dance, the Ritual uses quiet instrumental music under the voice; the musical freedom can grow as people move into the Solo Journey. Coordinate these phases instead of imposing a separate arc over them.
Recover calmly
The mix drifts or the beats clash
Reduce or remove the incoming track, let the stable track continue, and re-cue privately. Check tempo, grid and the first beat. Use a short exit or a later phrase rather than leaving two competing rhythms audible while you troubleshoot.
The incoming track is much too loud
Reduce its channel level promptly, then correct its trim. Check whether an effect, EQ boost or auto-gain setting contributed. Do not lower the entire room unnecessarily while the incoming channel remains the problem.
There is no sound
Check playback and meters, then channel fader, crossfader assignment, master, output routing and physical connections. Signal on your meter but silence in the room suggests looking further down the chain with the engineer. Do not turn every control up; sound may return suddenly.
The computer or controller fails
Use the tested independent backup route and notify the host. Keep outputs controlled while reconnecting. If playback cannot resume quickly, let the facilitator hold the pause honestly. Do not create a dangerous scramble across cables in a dark room.
You have less time than planned
Remove a middle chapter or an extra peak. Choose a prepared route into the descent and protect a meaningful landing. Do not squeeze every planned track into frantic short excerpts.
After the final sound
Let the agreed quiet or closing happen before packing down. Save the track history and any permitted recording. Ask the host what worked, what felt rushed, and what the room needed. Write down two changes while the memory is fresh.
14 / Music, culture & care
Know what you are bringing into the room.
Listen to lyrics, spoken samples and the meaning of an unfamiliar language. “I do not understand the words” is not the same as “the words have no effect.” Consider aggression, degrading language, sexual content, political messages, sudden screams and recordings with personal or sacred significance.
This does not require a set made only of pleasant feelings. Anger, grief, humor, sensuality and darkness can belong. Give them context, pacing and choice. Avoid promising that an intense passage will heal someone or using distress as evidence that the music is working.
Be specific about musical roots
Terms such as “world,” “tribal” and “medicine music” can obscure very different people and traditions. Learn the artist’s name, the rhythm, the language and the recording’s context. Check whether material is intended for public circulation. Support the musicians and credit original artists as well as remixers.
Do not label every hand drum African, every chant Indigenous, or every unfamiliar scale mystical. Your curiosity can be precise. A beautiful track does not give you permission to claim the tradition it comes from.
Recording and sharing
Agree recording with the organizer and tell participants when ambient sound, voices or images may be captured. An audio feed from the mixer can still include a live microphone. Respect the event’s camera and phone agreements; a promotional clip should not override them.
Buying a track, playing it publicly and distributing a recorded mix are different uses. Confirm event licensing responsibilities with the organizer and check the publishing platform’s current rules before uploading. Mixcloud’s licensing guidance is one place to start for mixes; platform permissions and restrictions vary.
Where sharing is permitted, include a tracklist with artists, titles and remix credits, plus links that help listeners support the creators. Do not redistribute individual tracks or assume that recording permission from an event clears music rights.
15 / Learn through practice
Build the skill one listening task at a time.
Progress when you can hear the result, not when you have spent an arbitrary number of days practicing. Record short exercises where permitted, dance to them away from the controls, and take specific notes.
Find the musical “one.” Count bars in several tracks. Mark the beginning of phrases and predict the next change. Include a track whose structure surprises you.
Complete ten clear handovers. Use nearby tempos and uncomplicated arrangements. Focus on private cueing, phrase timing, matched loudness and bass control. Keep effects off.
Make three different exits from one track. Try a blend, a phrase cut and a breakdown bridge. Listen to which preserves the song best and why.
Cross a difficult boundary. Move between a steady groove and live drums, then between distant tempos. Practice a half-time relationship and a transition that resets the pulse.
Build a short complete journey. Choose a small number of tracks with an arrival, development and landing. Dance through the whole recording. Mark where you feel rushed, bored, confused or pleasantly surprised.
Rehearse a changed plan. Start from an unexpected track, remove a planned peak, or shorten the set. Practice recovering from a bad cue and switching to backup playback at low volume.
Play a small, clearly framed practice dance. Invite feedback about movement, pacing and sound. Have someone else hold practical support so you can concentrate on the music.
Review and repeat. Ask for time-specific feedback: “Where did you lose the thread?” is more useful than “Was it good?” Keep the transitions that worked and refine the passages that did not.
Record the set. Listen again later.
When preparing a set, record yourself playing the whole journey. Then leave it for a while and listen again at another time, away from the decks. While mixing, you are busy choosing tracks and operating the controls. Listening later lets you hear the experience as a dancer.
First, listen for the journey: does each passage have time to develop, do the peaks feel earned, and is there enough recovery? Then listen for the joins: sudden level changes, competing basslines, awkward phrases, clashing melodies or a transition that interrupts the song. Note the time of each moment you want to improve.
Dance to the recording too. A technically clean set still needs to work for moving bodies. Change the passages that feel rushed or disconnected, rehearse them, and record another version. Keep useful alternative tracks ready alongside the route you have prepared.
Stand up and dance while you mix
When you can, stand up and dance to the song you are playing. Feel its weight, groove and energy in your own body. As you preview the next track, move with it too: does it continue the invitation, increase intensity naturally, or offer the release you intend?
You are making a DJ set for dancing. Let your body be part of the preparation and the performance, while keeping your ears on the mix and your attention available to the room. Find a comfortable way to move that works for you and your setup.
Listen to a full set like an apprentice
Choose a recording from a DJ you respect, including Onizal’s music. On the first listen, dance. On the second, note each major change in pulse, density or emotional color. On the third, study a handful of transitions. Ask what made the next track feel possible. Reproduce the principle with your own music rather than copying the whole selection.
When are you ready for a first booking?
You can sustain a complete journey, preview privately, keep levels consistent, adapt your route, finish on time and operate your backup. You understand the host’s expectations and can say honestly what you can deliver. You do not need every advanced trick; you do need reliable basics.
16 / Keep learning
A few words you will hear often.
Beatgrid
A software map of beats and bars. Verify it against the music.
Breakdown / drop
A passage where the arrangement opens or thins; the return or arrival of a stronger section.
Cue / hot cue
A prepared playback position. Headphone cue is a separate use of the word: private monitoring.
Gain / trim
The level adjustment for a signal, commonly used to match tracks before mixing.
Headroom / clipping
The remaining margin before a signal exceeds a stage’s capacity; the distortion that can result when it does.
Key lock
Processing that aims to preserve pitch while playback tempo changes.
Phrase
A group of bars forming a musical thought. Its length depends on the recording.
Quantize
A setting that aligns supported actions to the beatgrid. Incorrect grids make those actions incorrectly timed.
Stem
An isolated musical part such as drums or vocals, either supplied separately or estimated from a mixed recording.
Swing / syncopation
Unequal timing of subdivisions; accents placed away from expected strong beats. Related rhythmic ideas, but not synonyms.